Patterned paper banner birthday card

I’ve seen a few cards online which showcase a single piece of patterned paper (such as here and here), and if you’ve been following this blog, you’ll realise that I’ve recently built up a little stash of pretty paper and am just itching to find ways to use it! I recently made good use of some on these paper covered pencil pots, and now I want to use some more on a card!

I liked the idea of having a simple sentiment on top of the patterned paper, but rather than just writing in a square, I decided to use a banner going across the card. And this is the result!

DIY happy birthday banner card

I have to admit that the banner is not my idea, nor my design. I got it from The Postman’s Knock, one of my favourite blogs. Lindsey is a very talented calligrapher and letterer and has loads of very inspiring tutorials for cards and illustrations, alongside calligraphy tutorials and tips. In this tutorial, she goes through in detail how to draw a banner, so I just followed her tutorial to draw my own banner.

After a couple of practice goes, this was what I came up with:

Happy birthday hand drawn banner sketch

I wasn’t confident that I could write a nice calligraphy phrase on my banner (like Lindsey did), so I chose to write some simple tall thin letters instead. To make it a little more interesting, I thickened the verticals.

As you can see in the picture above, I drew it in pencil and then went over it with a pen. This was so that the lines would be clearly defined, which is important because I then traced it onto coloured paper in black pen. I used a light box, but you could hold the paper up to a window instead, so that you can see the writing on the paper behind.

Once the banner was complete I cut a border around it in the same way that Lindsey did because I liked the effect.

Then I simply mounted my patterned paper onto another piece of coloured paper and mounted that onto my card blank, and then glued the banner across the front. Simple but effective!

Tutorial hand drawn banner card

Patterned paper birthday card

Do you like this style? Have you made any cards with patterned paper yourself? I’d love to hear more ideas on how to use it!

Thanks for reading!

Rachel

Hand lettered triangle stamped birthday card

So it would seem that I’ve been making a lot of cards recently! I’ve recently published a layered name card, this washi tape bunting card and a whole bunch of different designs with masked letters (here, here and here). And I’ve got one more design for you after this one!

This time I was making a birthday card for my brother so I needed something not too feminine, and as usual I didn’t have much time to make it! And this is what I produced:

easy and simple modern birthday card tutorial

I think this was the quickest card I’ve made recently (maybe apart from the washi tape bunting one). I thought I’d try my hand at a bit of hand lettering, and it came together really quickly. Hand lettering is something that I’d really like to get more into – I think it makes a big difference on cards especially. I’ve dabbled a bit with calligraphy in the past (such as with these Christmas cards, and this family tree) but I’d definitely like to take it further in future.

Anyway, I had a vague idea that I wanted the hand lettering to be made of quite round serif letters with thick sides and thin lines elsewhere, and after a couple of practice runs I just sized it to fit onto the card, drew some guidelines and drew the letters in pencil. I made the middle of the letters 10mm high, and the ascenders and descenders were 8mm high, which fitted really well on this DL card blank. Then I went over the outlines with a gold pen and filled in the thick sides with squiggles. I think I may have left too much space between the letters but overall I’m quite pleased with it.

triangle stamped DIY card

To make the triangles, I cut a triangle shape into the end of a pencil eraser and randomly stamped the triangles above and below the text using ink pads. These two colours are the only two colour ink pads that I have but I think they work well together!

pencil eraser triangle stamp

I think the card has quite a modern look and it came out better than I was expecting!

hand lettered birthday card

Have you tried hand lettering? What’s your favourite style? Please share your designs below, I’d love to see them!

Thanks for reading!

Rachel

Easy DIY paper covered pencil tins

I think this is the easiest craft I have ever done! As I mentioned a couple of weeks ago, I have recently built up a small collection of pretty paper and I’ve been looking for crafts to use it on! Plus, I love the idea of recycling things that would normally get thrown out, so I’m happy to find a use for these tin cans! And they turned out pretty nice :)

DIY paper covered pencil pots

The paper I used is ‘Into the Woods’ by UW Scrapbooking, which I bought at Popular Books (in Hong Kong). Isn’t it pretty?! The paper only measures 15cm by 15cm which isn’t long enough to wrap all the way round the cans so I had to use two pieces of paper for each can. This means that there are two paper seams, which isn’t ideal but I’ll survive ;)

Easy recycled tin can craft

The cans that I used were ones that had a ring pull on top, so the lid came off in a smooth circle. This meant that I didn’t have to file any rough edges which I would have had to have done if I had used a tin opener to open the cans.

To cover the cans, I first measured the distance between the metal strips at the top and bottom of the cans and cut paper strips to that width. Then I stuck them onto the cans by gluing the back of the paper strips with a glue runner (I put the glue around the edges and then in stripes over the rest of the surface) and then very carefully stuck the strips to the cans. I tried to make sure they were as straight as possible!

My favourite one is this one with the fox paper – so pretty!

Fox paper pencil pot

I was really pleased with how they came out, and now they are sitting in pride of place on top of one of our bookcases – where the pens are in easy reach for us but not our young children!

Have you done anything similar yourself? Please let me know in the comments below – I’d love to see what you’ve made!

Thanks for reading!

Rachel

Layered name DIY card

One of my friends recently had a baby and I wanted to make a card for them with the baby’s name on. I really liked font I used for my niece’s birth card (which you can see at the bottom of this post) but I wanted to do something different with the card itself. I’ve recently bought some pretty paper supplies so I thought I’d put them to good use! And this is what I came up with:

Layered paper card tutorial

Isn’t it a cute name?

Whilst this card was pretty straightforward to make, I was surprised by just how long it took. There is a lot of cutting out! But I love the layered effect, so I think all that cutting is worth it.

If you’d like to make something similar yourself, read on for the tutorial…

Firstly you will need:

  • Card blank
  • Paper in different colours and patterns
  • Craft knife or scissors
  • Glue (I used a glue runner but pritt stick or any glue suitable for paper will do)
  • Pencil
  • Printer (optional)

Firstly (and this is also the fun part), decide what colour papers you will use and in which order. I always find it quite difficult to find colours and patterns that match together well!

Once you have picked your paper, you now need to pick your lettering. You can either use a font or draw the letters yourself. If you are drawing the letters, then simply draw the outline onto your paper. If you are using a font, then you need to choose your font. I used Marcelle, which is free on dafont.com (this font has a textured appearance but since I only wanted to use the outline and not the printed letters it didn’t matter). I typed the name I wanted to use on the card in Word, did a ‘print screen’ and pasted it into Paint, where I flipped the image backwards using the Rotate > Flip Horizontal command, and saved it as a jpeg.

Reflect the image in Paint

I then inserted this image into a blank Word document so I could size it to fit my card blank. And then I printed it onto the back of my patterned paper (which happened to have a different pattern on the back).

Backwards print

If you know a quicker way of doing this, please let me know! It was a bit convoluted, but it worked.

I then cut around the text with a pair of scissors. I filled it in where the text didn’t quite join up and made some of the thinnest parts a bit thicker so the papercut would be easier to handle. I’m not very skilled with a craft knife which is why I used scissors, but I used one to cut out the holes and the fiddly bits. If you are better at cutting out curves with a craft knife than me then you might want to use one for the whole thing!

Next, glue your papercut onto your next colour/pattern paper. I liked the idea of having the text in a pattern and using plain colours for the rest of the layers, but that’s just my preference. Using a pencil, draw around the text layer, trying to keep your line a certain distance away from the text at all times. I smoothed out many of the features of the text but kept some of the major indents and shapes.

Drawing the next layer

Now cut out along the line you have just drawn. Erase any pencil marks still showing. Stick this layer onto your next layer of paper and repeat until you are happy with the overall look and size of your piece. Mine had 4 layers in total.

Papercraft lettering card

Now you can glue it to your card blank and you are done!

Baby name card papercut

Luckily, my friend loved it :)

P1090229

I was a little disappointed with the contrast between the name and the next layer. I think I should have used a darker coloured pattern for the top layer. I also made this card for a little girl’s birthday using the same technique, and I was much happier with the colours.

DIY layered birthday card

Do you like this layered look? Let me know if you have a go at something similar yourself!

Thanks for reading!

Rachel

DIY washi tape bunting card

I love cute card ideas, so when I saw this and this very sweet washi tape bunting card on Pinterest I knew I wanted to have a go myself! It was really quick and easy to do and it came out so nicely that I ended up making three of them…

easy washi tape bunting card

I don’t really need to give a tutorial for this, you can just copy the look yourself. I cut a length of baker’s twine and cut short lengths of the washi tape, folded it in half with the twine at the fold and then cut each one into a triangle shape (this makes it neater than trying to cut the triangles first!). Then tie a bow at each end of the twine and glue to your card blank – I just used a blob of white glue for this.

glue bunting to card

For the text, I first wrote it in Word with this font and printed it out on a piece of paper. The long tails at each end of the text are the ( and ) symbols for this font.

happy birthday shorelines font

I then placed the printout behind my card blank and traced over it with gold pen using a light box, but you could also just hold both pieces up against a window and trace it that way if you don’t have a light box.

simple hand lettered card

I was so pleased with how this card came out that I made two more in different colours! Those two have already gone to some lucky birthday ladies, now I’m just waiting to send this one off soon!

easy garland birthday card

Do you like using washi tape on cards? I’d love to see your designs if you do, it’s so great to see how creative people can be with it! Also, please let me know if you try this washi tape bunting design!

Thanks for reading!

Rachel

DIY glitter glue card with masked letters

I’ve already shared with you two ways of making cards with silhouetted letters – stamping paint with a pencil eraser and using an ink pad and a patterned stamp. This week I will share the final way that I have used this technique, and it’s a bit brighter and bolder! This time I used glitter glue!

Happy birthday silhouetted letters card

If you want to make a card like this, then you will need:

  • Card blank (mine is DL size)
  • Post-it notes
  • Pen/pencil
  • Ruler
  • Scissors or a craft knife
  • Glitter glue (in a selection of colours)

I covered the method for making the letters (from post-it notes) and aligning them on the card in this post, so I won’t repeat that here, just head on over to the post and start from the beginning until you have something that looks like this:

using post-it notes for temporary masking letters

All I did next was to carefully cover my letters with glitter glue. I found that squeezing some out of the tube onto the card and then spreading it out with the tip of the tube worked really well. As you can see, I used a range of colours to make my design really bright! Then all you have to do is peel off the post-it letters and leave the whole thing to dry.

Glitter glue birthday card

I found that the glitter glue made my card a little bit wrinkled, but I guess that’s unavoidable unless you use a really thick card blank.

Bright and sparkly card tutorial

Glitter glue masked letters DIY card

What do you think? Will you have a go yourself? Maybe you could do a pattern in the glitter glue, such as circles or waves?! That might look pretty cool. Let me know what you come up with!

Thanks for reading!

Rachel

DIY ink stamped card with silhouetted letters

At the beginning of January, I showed you how to make a paint stamped card with silhouetted letters. I really liked the way the letters were blanked out in the design and I wanted to make another card using the same method for the letters but a different method for the background. I decided to use an ink stamp this time, and see how that came out. My Mum’s birthday was coming up – the perfect opportunity!

Now, I know some people have serious collections of stamps and ink pads, but I am not one of them. I do have just a few stamps with pretty patterns, so I selected one of them and used a purple ink pad. And this is what I came up with:

using stamps to make a unique card

If you want to make a card like this, then you will need:

  • Card blank (mine is DL size)
  • Post-it notes
  • Pen/pencil
  • Ruler
  • Scissors or a craft knife
  • Stamp
  • Ink pad
  • Coloured pen (optional) – mine is gold

I covered the method for making the letters (from post-it notes) and aligning them on the card in this post, so I won’t repeat that here, just head on over to the post and start from the beginning until you have something that looks like this:

using post-it notes for temporary masking letters

Now comes the fun part! Take your stamp and stamp away over the letters. How you stamp is totally up to you. As you can see, I chose to make my pattern of stamps roughly regular with similar spacing between all the stamps, but you could overlap them if you like the look. I was trying to make my stamp pattern very neat and even but it was very difficult! (maybe a more experienced stamper would be better at this than me)

Tip: When making each stamp impression you need to press down hard so that the ink goes right up to the letter edge. Otherwise, because the post-it letter is slightly raised from the surface of the card, there will be a gap between the edge of your letter and the start of the stamp impression, which will make your letters less clear.

DIY stamped silhouette card

I have to admit that I wasn’t very happy with my stamping. Some of the stamps didn’t come out that well (especially the ones in the middle) and this meant that the edges of some of the letters weren’t very obvious. It also looked a bit boring in monochrome! (you could avoid this by stamping in more than one colour)

So I decided to draw in some more detail in my pattern with a gold pen. This really elevated the card and made it look more interesting and more special, in addition to making the letters more clear.

adding detail to a stamped card

Finally, peel the post-it letters off, and admire your card!

lacy stamping and blanked out letters

Now, I have to admit that I wasn’t 100% happy with this card. I think the stamp is very pretty but it is too delicate. The letters would have looked a lot better if I had used a stamp which had more inked area so the edges of the letters would have been much clearer.

But I’m sure you could do better! Do let me know if you have a go yourself, I’d love to see what you come up with!

Thanks for reading!

Rachel


Easy DIY pencil eraser stamped birthday card

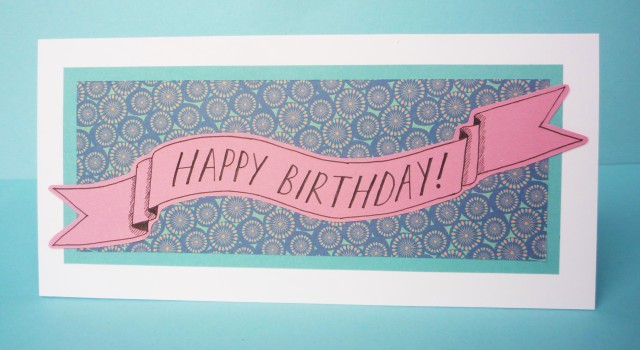
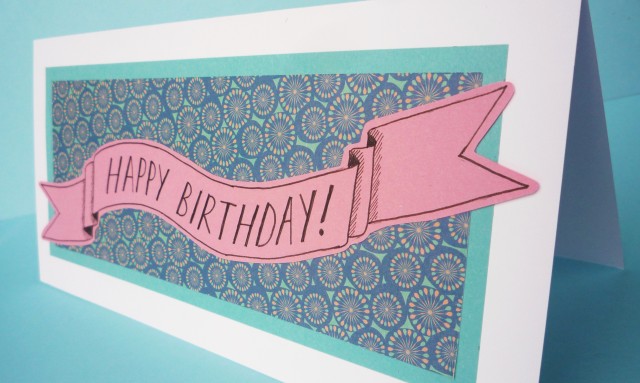
I find Pinterest very inspiring, do you? A while ago I came across this pin which shows you how to stamp a silhouetted heart shape onto a tote bag using a pencil eraser, and I thought to myself “that would make a lovely card”. But the card was going to be for my husband’s birthday, so a heart wouldn’t necessarily have been the most appropriate (we’re not that soppy!), so I wanted to choose something else for the silhouette shape. I could have done a large monogram-style letter (like I did with this card) or number (like I did with this card), but instead I decided that I wanted to write ‘Happy Birthday!” And this is how it came out:

easy stamped birthday card

The hardest part was actually figuring out how to make the removable letters that I was going to stamp over. I needed something that would stick to the card without being too thick (my first thought was to stick paper letters down with blu tak but that would have lifted the letters away from the card too much). From my wanderings through blogland, I remembered that one blogger (Minted Strawberry, who I have featured in the past here) used vinyl to create a silhouette that she spray painted over to decorate the front of a notebook (see here for details) and then peeled the vinyl off to reveal the design. Another blogger (The Postman’s Knock – fantastic resource for calligraphy and art!) hand-lettered a silhouette using art masking fluid in the place of ink, painted watercolour over the top and then peeled off the (now dry) fluid to reveal the letters (see here for details).

But I didn’t have vinyl or art masking fluid. So instead I came up with my own solution – post-it notes! It’s the most well-known temporary glue there is. So if you have some post-it notes lying around, and you’d like to try this card for yourself, then read on to find out how to make it!

For this tutorial, you will need:

  • Card blank (mine is DL size)
  • Post-it notes
  • Pen/pencil
  • Ruler
  • Scissors or a craft knife
  • Paint – you will need one strong colour, plus white (I used poster paints but I’m sure most opaque paints would work)
  • Felt
  • Paint-proof surface, such as a lid

1. Decide what shape or letters you want to have silhouetted on your card. I wanted to write HAPPY BIRTHDAY!, which worked quite well since the letters were quite small (mine were 2cm high) and therefore not much wider than the strip of adhesive on the post-it note. Larger shapes or letters might not work as well since a larger part of them won’t be stuck down with the adhesive.

2. Draw your shapes or letters on the post-it note(s). For some reason, I forgot to take a photo of this stage, so here is a mock-up of what it looked like. As you can tell, I needed two post-it notes!

cutting letters out of post-its3. Carefully cut out your shapes or letters. You could use scissors or a craft knife for this, whichever you find easiest. I didn’t bother to cut out the holes in my letters, partly through laziness and partly because I liked the effect!

4. Arrange your shapes or letters on the card. I found the easiest way to do this without marking the card too much was to make a mark at opposite edges of the card where I wanted the bottoms of my letters to be, and then place a ruler between the two marks. Then I could position the letters so that the bottom of each letter touched the ruler and voila! the letters were all nice and level. Also, I started with the middle letter and worked outwards either way so that my sentiment was aligned centrally (but obviously you can align yours however you like).

using post-it notes for temporary masking letters

5. Squeeze a fairly small blob of the coloured paint onto an appropriate surface (I used a margarine-tub lid) and then press your felt onto the blob. In order to make sure the felt is well soaked in the paint you can either use the end of your pencil eraser to repeatedly press the felt into the paint until it is soaked through, or turn the felt over so that both sides are covered in paint.  If you do the second option, then you will need to do some test stamps on a spare piece of paper with your pencil eraser to make sure there’s not too much paint on the eraser, or else you will not stamp cleanly. I discussed using felt to make a paint stamp pad in this post, if you’re looking for more information on this.

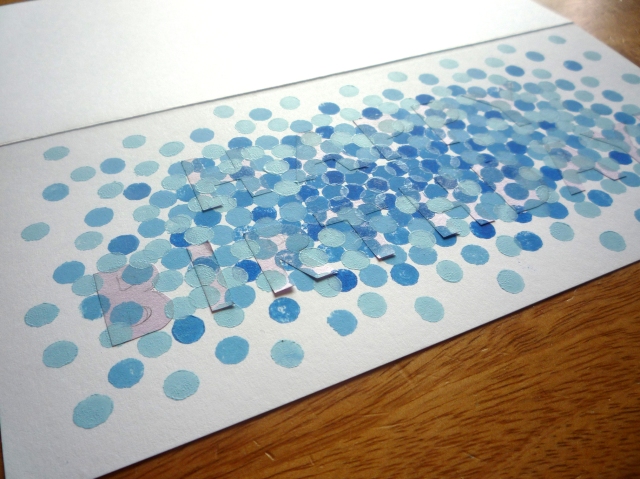
6. The next step is the fun part – stamping! Start stamping in the centre of your card. You want your spots to be closer together in the middle and spread out more away from the middle. Don’t go too far out though! You can see how far I went with my spots in this picture:

pencil eraser stamped card

7. Now on a different part of your lid, squeeze the same-size blob of your first colour as you did before, but now add some white and mix them together to make a slightly paler shade of your first colour. Stamp a little of this colour in the centre of your card, but more outwards, and again get further apart the further you get out. The aim is to avoid having rings of each shade, but mingle them so that there is a gradual colour change from dark in the middle to pale near the edge of the card. It also looks quite nice if the spots get more spaced out the further they are from the centre. Repeat this with increasingly paler shades of your first colour by adding more white paint each time and continue stamping until you have almost covered the card, or until you are happy with the effect. I had 4 shades of blue in my card.

Tip 1: Make sure that almost all the edges of the letters are covered in spots so that they will be clearly defined when the letters are removed

Tip 2: I found it easier to pretend that the letters weren’t there when stamping my pattern so that the pattern was more natural and even. This sort-of contradicts Tip 1 above, but you can always add in a few extra spots at the end if you think there are any edges that have been missed!

post-it note stamped card

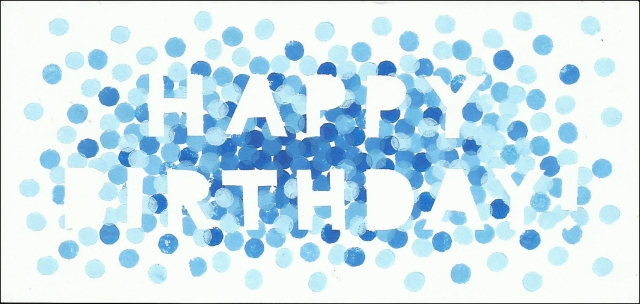
8. Now you are ready to remove the letters (another fun part!). I peeled off the letters while the paint was still wet to avoid the risk of pulling dried paint away from the card. I don’t know if that would have happened, but it worked fine doing it this way (as long as you don’t accidentally stick your finger in the paint!). This was the result:

silhouette letters stamped card

DIY pencil eraser stamped card


Yay! I was so pleased with it. And my husband liked it too, which is a bonus ;)

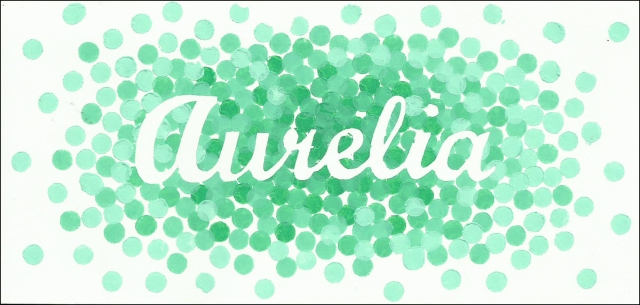
I liked it so much that I used the same technique (in green) to make a card for my new baby niece. Doesn’t she have a beautiful name?!

green shades pencil eraser stamped card tutorial

Do you like the ombre stamped spots effect as much as I do? Do let me know if you have a go yourself, I’d love to see it!

Thanks for reading!

Rachel

The Little Koo blog turns 3!

Wow, I have been blogging for three years now, can you believe it? This little blog started off with the intention of promoting the Little Koo Etsy shop (don’t forget about the closing down sale btw, only 5 more days!) but I enjoyed writing about Hong Kong so much that it ended up being mostly about the things I see and do here, with a bit of craft stuff thrown in.

So, in celebration, I thought I’d recap some of my most popular posts over the last few years. Maybe you haven’t seen them yet, or maybe you’ve just forgotten! On the topic of Hong Kong, here are some of the most-seen posts over the last few years:

Nan Lian gardens

Nan Lian Gardens and Chi Lin Nunnery


Shau Kei Wan typhoon shelter

Hong Pak – a walk with a nice surprise at the end


Shroff sign

English usage in Hong Kong


Wide view from Jardines Lookout

An uphill climb to Jardine’s Lookout


Chek Keng 3

Maclehose trail stage 2: hills, beaches and lots of rain!


Shek O beach and headland

Life’s a beach in Shek O


I hope you’re enjoying my Candid Hong Kong series too, where I post random photos I’ve taken around Hong Kong to show a snapshot of life here.

Outside of Hong Kong, I’ve also blogged about some of our travels around Asia. My posts about our holiday in Malaysia where we stopped off at the Cameron Highlands, Georgetown (Penang) and Langkawi have also been pretty popular.

On the craft side, my post about buying craft supplies in Hong Kong has been by far and away the most popular post I’ve ever written. I’ve tried to make it a really useful resource, and I’m constantly updating and adding to it. However, I do love to make things myself with the supplies I find, and these have been some of my most popular ‘makes’:

Fabric covered shell handbag

Covering a box clutch purse – a no sew handbag!


Handmade wire button heart

How to make a wire button heart


Moravian star mobile

Making a froebel star mobile


Hand decorated jars

Hand decorated jam jar luminaries


Woolly pompoms galore

Two ways of making woolly pompoms


Ok, so that’s it for my round up. What’s your favourite post? Have you ever tried any of the crafts I’ve featured on this blog? I’d love to hear from you!

Thanks for reading!

Rachel

DIY crystal stud earrings

As I mentioned in my recent post on DIY button stud earrings, I am looking to increase my collection of stud earrings since the twins like to pull on dangly earrings. So when I saw these beautiful DIY crystal earrings on Thanks I Made It, I really wanted to try this for myself!

My only concern was, where do I get the crystals from? You can get them from Amazon UK if you search for “sew on crystals” (but make sure you buy the ones mounted in metal clasps, not the flat back ones), but that was no use to me in Hong Kong. But then I was wandering down Yu Chau Street in Sham Shui Po (THE best place to get craft and jewellery supplies in Hong Kong!) and came across a whole shop-load of them! I was in heaven trying to choose which ones to buy!

So, being totally predictable, I fell for some round mint green crystals and paired them with some marquise (leaf) shaped clear crystals. I got out my trusty E6000 glue and just stuck them together and stuck the earring back on (I didn’t bother with the wax paper like she did in the tutorial above, but it might be a good idea if you’re worried about everything sticking together).

DIY crystal stud earrings

It was so simple and quick and I love the results! I’m definitely going to make more of these!

Handmade mint green crystal stud earrings

What do you think? Will you have a go yourself? Do let me know if you do!

Thanks for reading!

Rachel